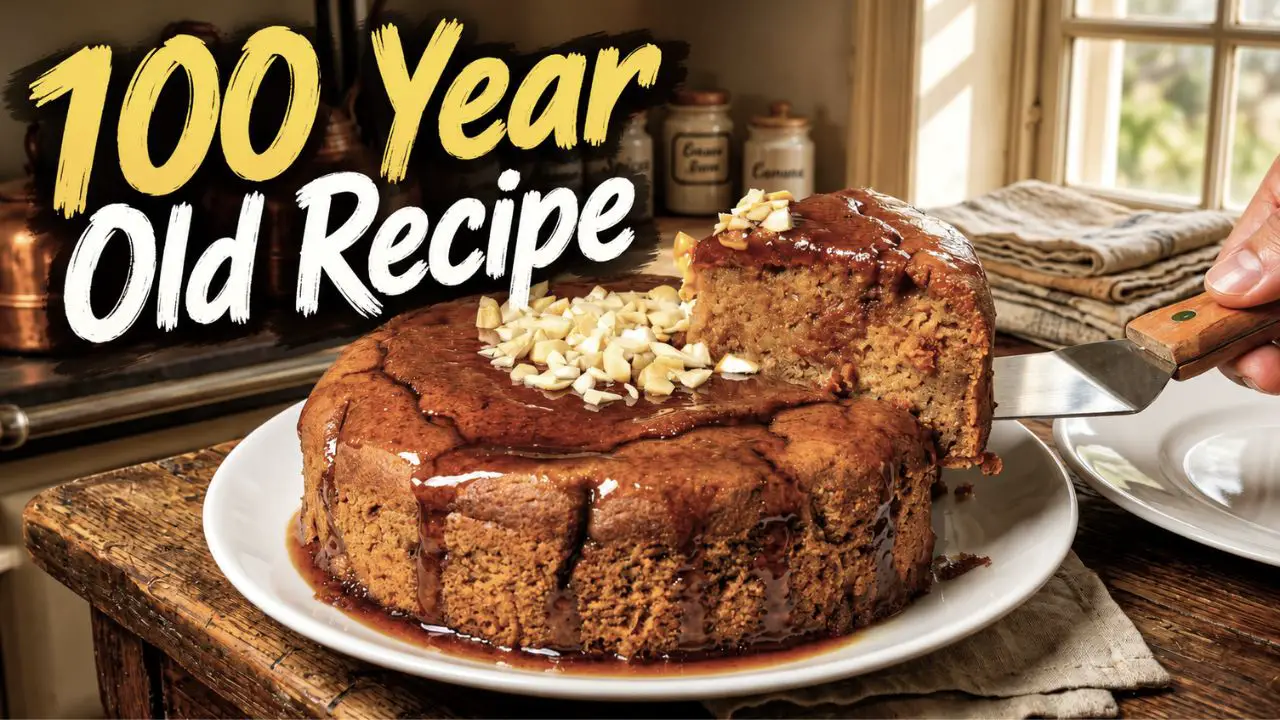
This Grandma’s sticky date cake is soft, sweet, cozy, and exactly the kind of old-fashioned cake I want with a cup of tea. It gets its sweetness from dates, bakes up beautifully moist, and that little drizzle of date syrup on top makes it extra special without making it fussy.
Come join me on Facebook here for easy recipes, cozy bakes, and little kitchen tips from my kitchen to yours.
Watch the video below to see exactly how I make this Grandma’s Sticky Date Cake, step by step. If you liked this cake, please like the video and subscribe to my YouTube channel for more cozy homemade cake recipes.
Why you’ll love this sticky date cake
This is the kind of cake that feels homemade in the best way. It is not fancy, it is not difficult, and it does not need a perfect finish to be delicious. I’m obsessed with how simple it is once the dates are softened and blended.
It is also a really nice cake for people who want something sweet without using regular sugar in the batter. The dates do the heavy lifting here, and they give the cake that deep, rich sweetness that tastes almost caramel-like. How can you not love that?
Texture and flavor
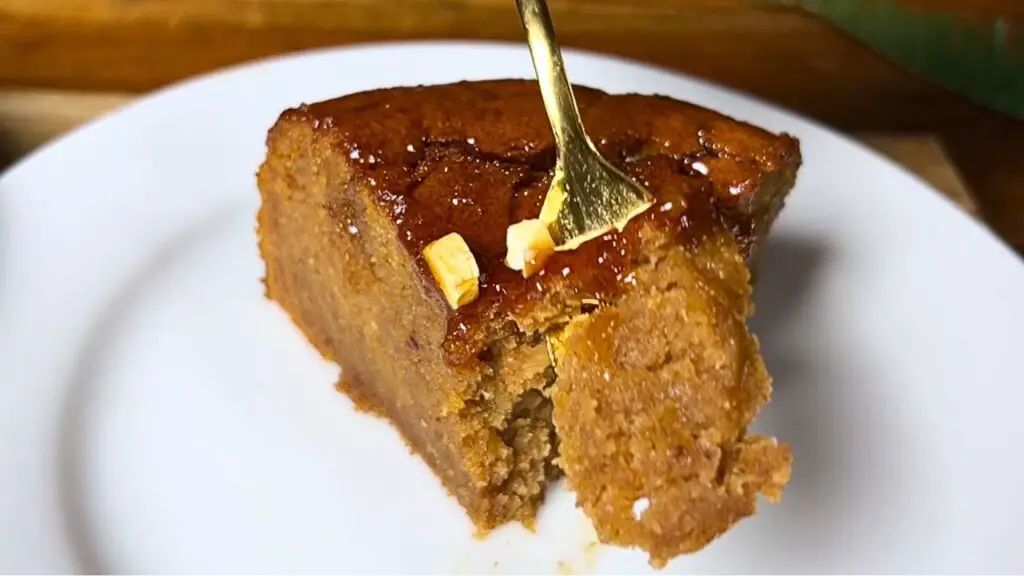
This cake is moist, soft, and a little sticky, especially after the date syrup goes on top. It has a deep date flavor, but it still tastes like a proper cake, not like a heavy date bar.
The walnuts on top add a little crunch, which I love because the cake itself is so soft. In my opinion, walnuts go best with date cake like this, but you can use another nut if that is what you already have.
Grandma’s date cake ingredients
For the cake:
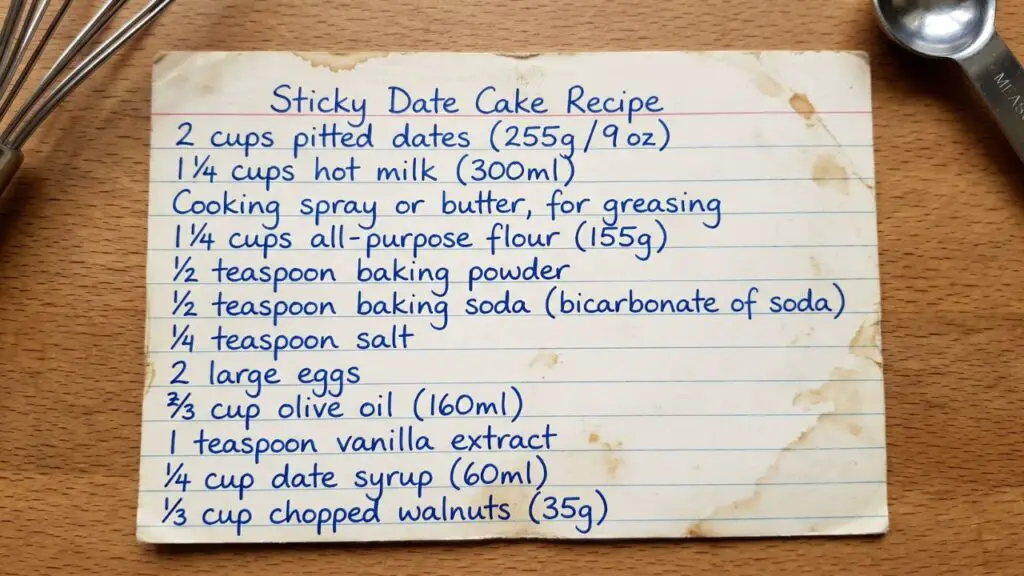
- 2 cups of pitted Medjool dates, 255g
- 1 ¼ cups of hot milk, 300ml
- Cooking spray or butter, for greasing
- 1 ¼ cups of all-purpose flour, 155g
- ½ teaspoon of baking powder
- ½ teaspoon of baking soda
- ¼ teaspoon of salt
- 2 large eggs
- ⅔ cup of olive oil, 160ml
- 1 teaspoon of vanilla extract
For the topping:
- ¼ cup of date syrup, 60ml
- ⅓ cup of chopped walnuts, 35g
Equipment you’ll need
- Blender or food processor
- Large mixing bowls
- Spatula
- Sieve
- Hand mixer
- 9-inch springform pan or 9-inch round cake pan
- Parchment paper
- Toothpick for checking the cake
How to make sticky date cake
Soften the dates first
Step 1: First, add 2 cups of pitted Medjool dates to a bowl. The amount does not have to be perfectly exact, so if you have a little more, do not stress. A few extra dates will only make the cake a bit sweeter and stickier, which is exactly what we want here.
Just make sure the dates are all pitted before you use them. I like to check them one by one because you really do not want to bite into a date pit later, and you definitely do not want one going into the blender.
Step 2: Once the pits are removed, pour 1 ¼ cups of hot milk over the dates. Give everything a quick mix so the dates are covered, then leave them to soak for 1 hour. This helps the dates soften, so they blend much more easily.
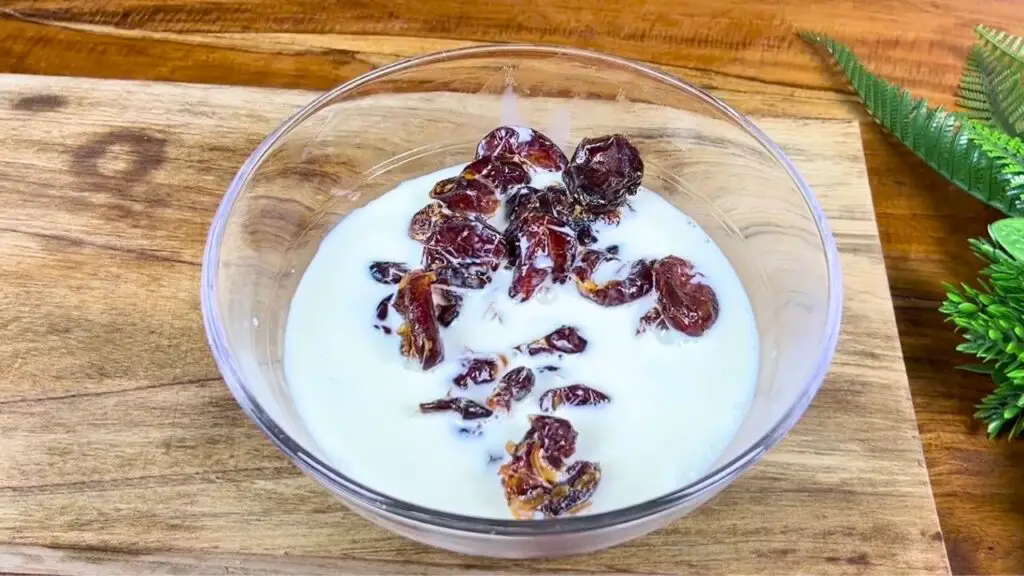
Top Tip: If your dates feel very firm or dry, do not rush the soaking time. The softer they are before blending, the smoother and easier your date mixture will be.
Blend the date mixture
Step 3: Then, blend the soaked dates for about 1 minute, until they break down into a smooth date mixture. I am using a blender here, but a food processor works too, so use whichever one you have.
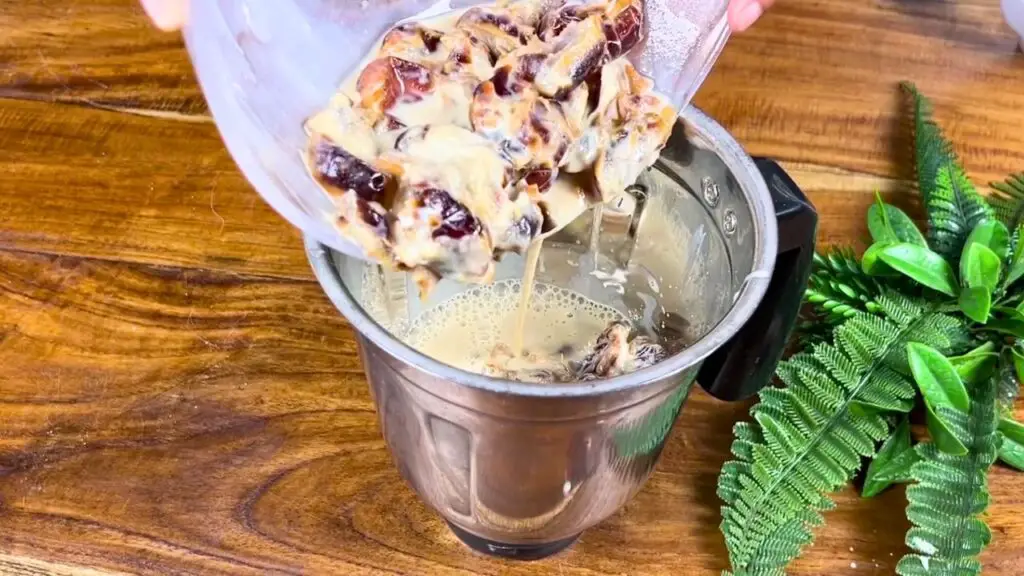
Because the dates are already soft, they should blend without too much trouble. The mixture should look thick, creamy, and mostly smooth, as you can see in the video. It does not need to be perfectly silky, and a little natural date texture is fine.
Mix the wet ingredients
Step 4: Then, scoop the date mixture into a large mixing bowl. It can be a bit annoying to get it all out because it is sticky, so take your time with a spatula. Scrape around the sides, the bottom, and under the blade if you can. I think I did quite well here.
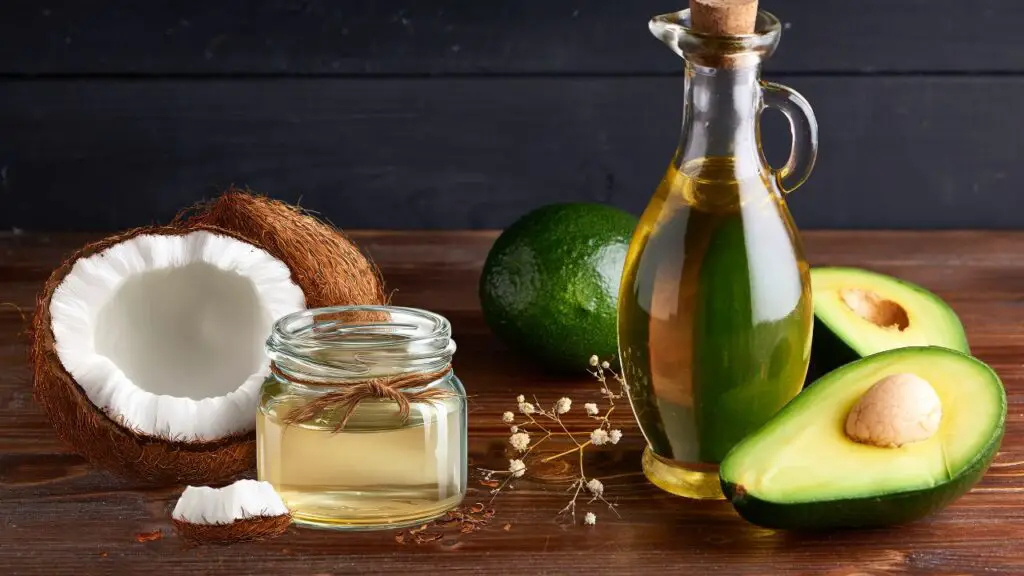
Then, pour in ⅔ cup of olive oil. I like olive oil here because it keeps the cake moist and works really well with dates, but you can also use avocado oil or melted coconut oil if you prefer.
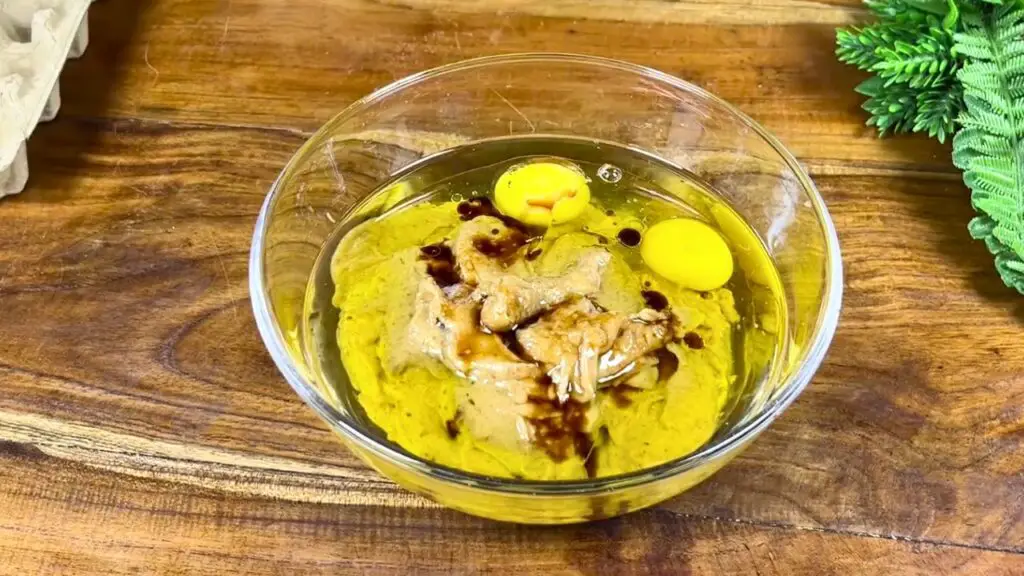
Then, crack in 2 large eggs. If you want to be extra careful, crack each egg into a small cup first to make sure the egg is good, so you do not ruin the whole batter if one egg is bad.
Then, add 1 teaspoon of vanilla extract. It gives the cake a little more flavor with the dates, and it makes the mixture smell sooo good.
Step 5: Then, use a spatula and carefully mix everything together first. We are just doing this to mix the oil in a little, so when we use the hand mixer, it does not splash everywhere and make a massive mess. It does not need to look smooth yet. Just mix until everything looks a little more even.
Note: Do not go straight in with the hand mixer while the oil is still sitting separately. A quick spatula mix first makes this much cleaner and easier.
Sift the dry ingredients
Step 6: Once the wet mixture looks nice and smooth, leave it aside for a moment. Then, take a sieve and add 1 ¼ cups of all-purpose flour, ½ teaspoon of baking powder, ½ teaspoon of baking soda, and ¼ teaspoon of salt.
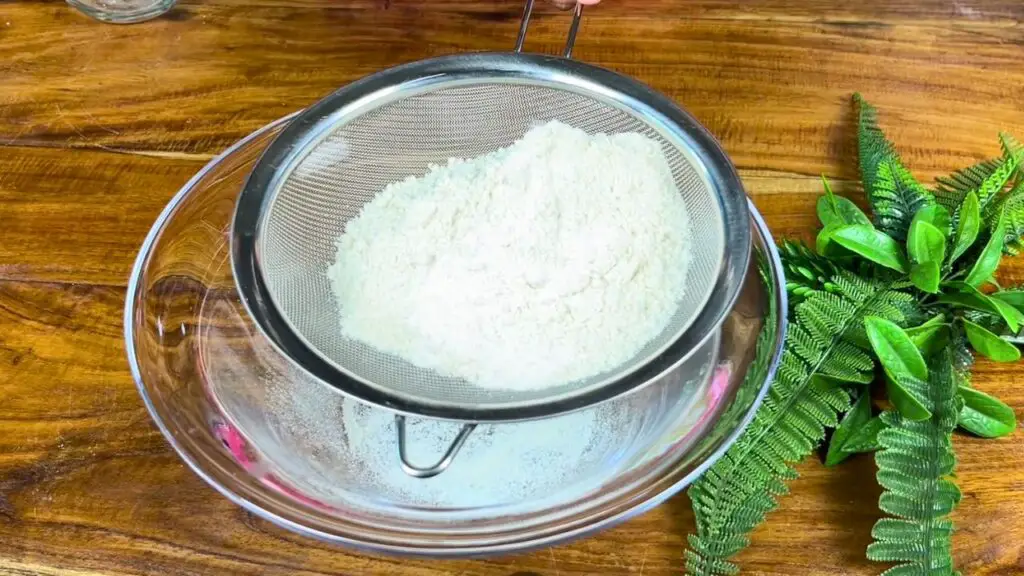
Sift everything into another mixing bowl. This helps remove little lumps and makes the dry ingredients easier to mix into the batter.
Bring the batter together
Step 7: Now, pour the date mixture into the bowl with the dry ingredients. I am scraping the bowl really well here, trying to get as much of that mixture out as I can, because we do not want any of that good stuff going to waste. This is what makes the cake sweet, moist, and sticky, so take a second and get every last bit in there.
Step 8: Then, use a spatula and carefully give everything a good mix first. Start slowly and fold the date mixture into the dry ingredients until the flour is lightly mixed in. You could mix it by hand if you want, but here I am just giving it a quick head start before using the hand mixer.
This helps the batter come together more easily, and it also stops the flour from flying all over the place when the hand mixer goes in.
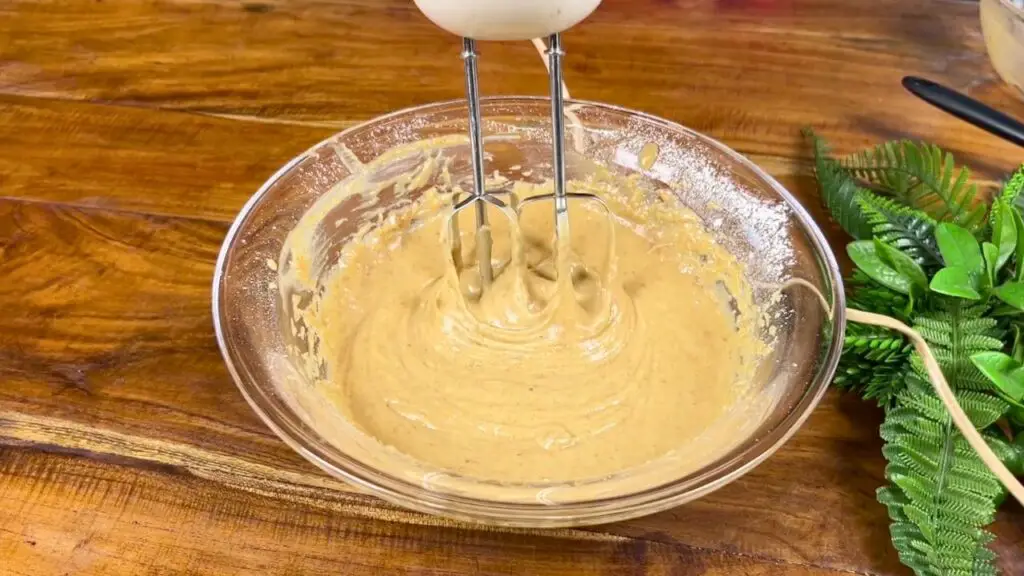
Step 9: Then, use the hand mixer and mix until everything looks nice and smooth. Look how nice the batter turns out. It should have a similar consistency to pancake batter, smooth and a little thick, but still pourable.
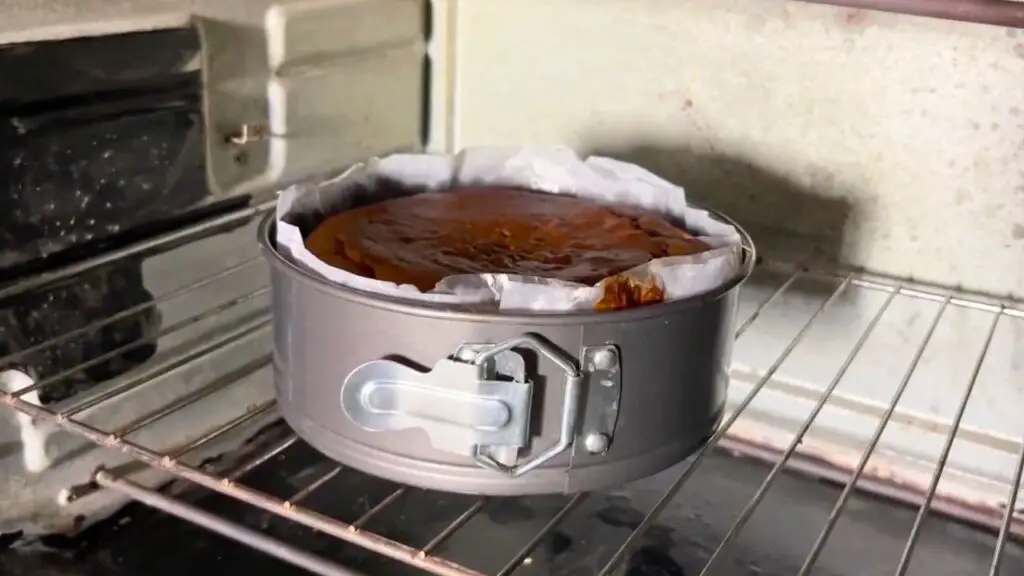
Bake the date cake
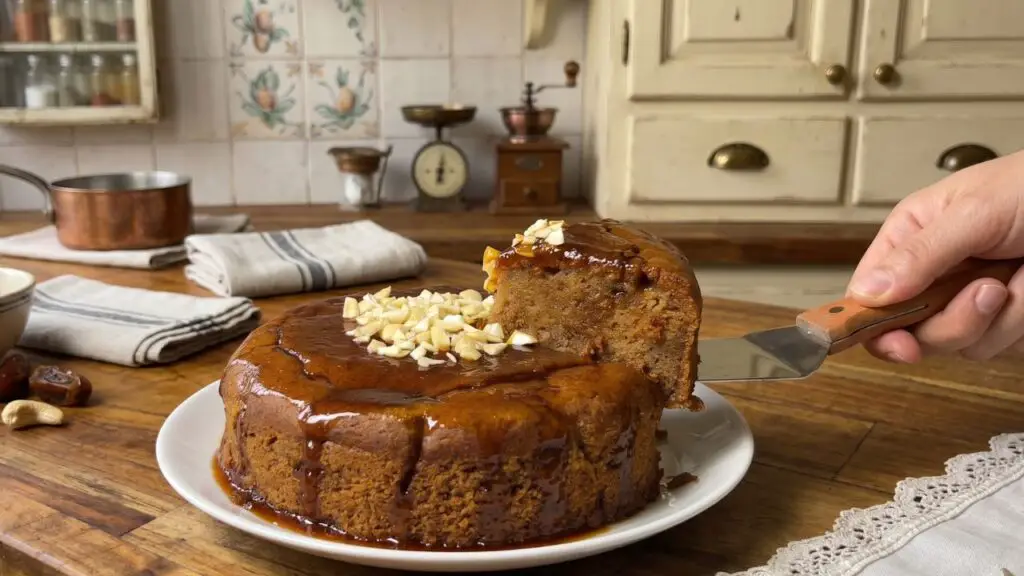
Step 10: For baking, I am using a springform pan covered with parchment paper, so it will be much easier to remove the cake later. You can use a regular 9-inch round cake pan too. Just grease it well and line the bottom with parchment paper if you can, because this cake is soft and moist.
Pour all the cake mixture into the pan, and use a spatula to scoop out as much as you can from the bowl. Then, smooth the top with the spatula so the batter sits evenly in the pan.
Then, tap the pan on the counter a few times to help the batter settle and remove any large air pockets.
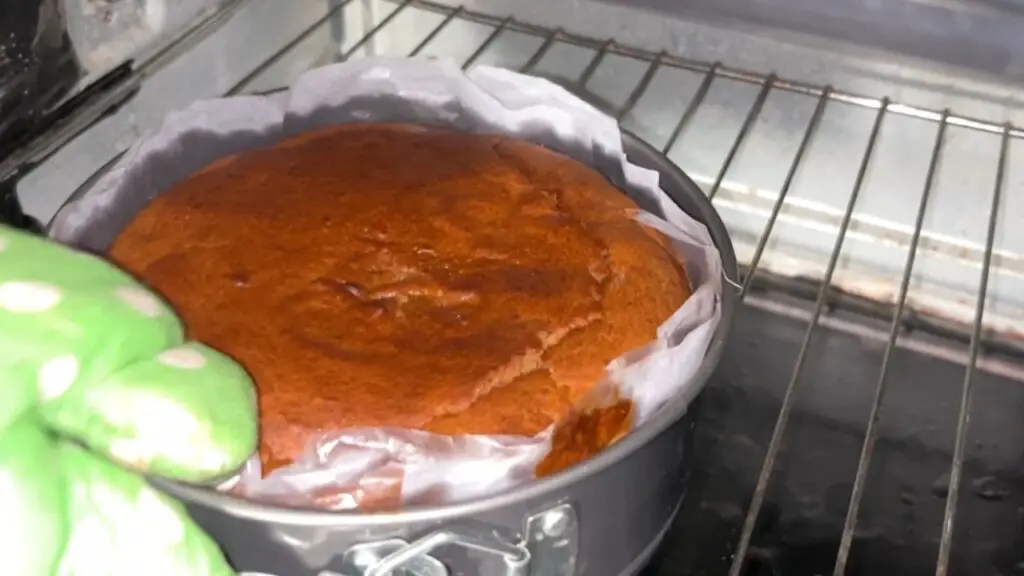
Step 11: Bake the date cake in a preheated oven at 350°F, which is 175°C, for about 35 minutes.
When the cake is almost done, the kitchen should smell absolutely amazing. Start checking around 30 minutes, because ovens can run a little differently. The cake is ready when the top looks set, and a toothpick inserted into the center comes out mostly clean. A few moist crumbs are fine, but you do not want wet batter on it.
Top Tip: Do not overbake this cake. The dates help keep it moist, but if it stays in the oven too long, you can lose that soft, sticky texture that makes it so good.
Cool and finish the cake
Step 12: Let the cake cool a bit before removing the side of the springform pan. It is still soft when it first comes out of the oven, so give it a little time to settle before you try to move it.
Then, carefully peel off the parchment paper so the edges stay nice, and the cake does not tear. Go slowly here, especially if the cake is still a little warm.
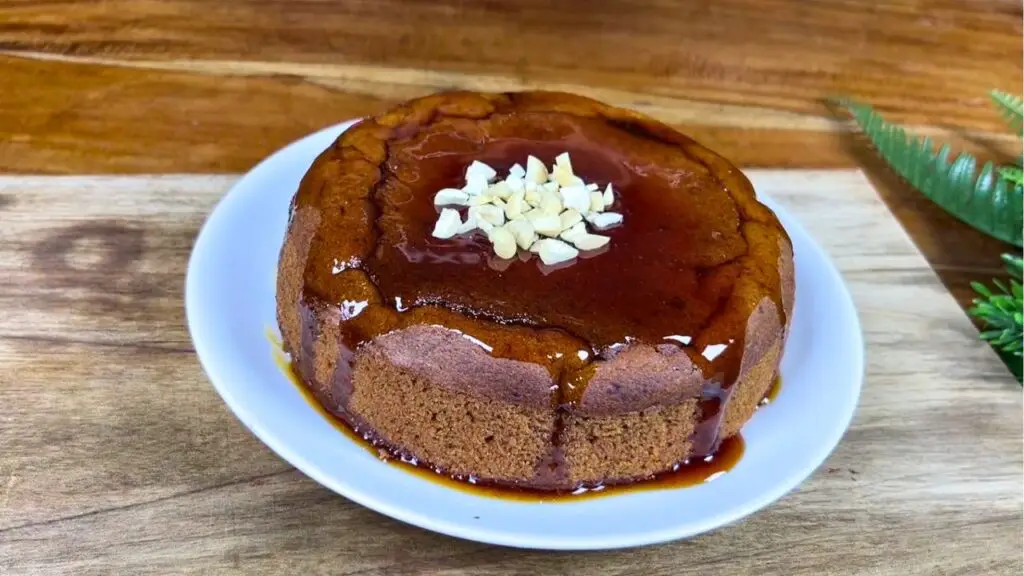
Step 13: This cake is so moist and sweet that you can honestly serve it just on its own, especially when it is still a little warm. But I do remember my grandma always pouring a little date syrup on top, not too much, just enough to make the top glossy and give it that extra bit of richness.
Then, sprinkle a handful of chopped walnuts over the top. You can use almonds, pecans, or whatever nuts you already have at home, but I think walnuts go best with a date cake like this.
Related Recipe: If you liked this old-fashioned date cake, you are absolutely going to like this date cake recipe here also.
Sugar-Free Date Blender Cake
Naturally sweet date cake with no added sugar, perfect for coffee or tea.
8
servings1
hour15
minutes35
minutes400
kcal1
hour10
minutesIngredients
2 cups (255 g / 9 oz) pitted Medjool dates
1 1/4 cups (300 ml) hot milk
1 1/4 cups (155 g) all-purpose flour
1/2 teaspoon (2 g) baking powder
1/2 teaspoon (2.5 g) baking soda
1/4 teaspoon (1.5 g) salt
2 large eggs
2/3 cup (160 ml) olive oil
1 teaspoon (5 ml) vanilla extract
1/4 cup (60 ml) date syrup
1/3 cup (35 g) chopped walnuts
Directions
- Pit Medjool dates and place them in a bowl.
- Pour hot milk over the dates and stir to cover.
- Soak dates for one hour to soften.
- Blend soaked dates until smooth.
- In a bowl, combine the date mixture with olive oil, eggs, and vanilla, stirring until mixed.
- Sift flour, baking powder, baking soda, and salt in another bowl.
- Combine wet and dry mixtures, mixing well.
- Preheat oven to 350°F (175°C).
- Grease and line a springform pan with parchment paper.
- Pour batter into the pan and smooth the top.
- Bake for 35 minutes or until a toothpick comes out mostly clean.
- Cool slightly, remove from the pan, and peel off the parchment.
- Drizzle with date syrup and sprinkle chopped walnuts.
Recipe Video
Notes
- Sugar-free date cake recipe: If your dates are extra soft and sticky already, you can reduce the soaking time slightly. Softer dates blend more smoothly and help make the cake naturally sweet without needing any added sugar.
- Simple moist date cake recipe with oil: Olive oil helps keep this cake extra moist even the next day. If you prefer, you can also use avocado oil or another mild oil with a neutral flavor.
- Sticky date cake no sugar: Because this cake has no refined sugar, the natural sweetness can vary depending on the dates you use. Taste your dates first, and if they are not very sweet, you can add a little extra date syrup on top.
- Sticky date cake recipe: Line the pan with parchment paper before baking. The sticky texture makes the cake delicate while warm, and the parchment helps remove it cleanly without tearing.
Nutrition Facts
- Total number of serves: 8
- Calories: 400kcal
- Fat: 21g
- Carbohydrates: 49g
- Protein: 5g
Easy swaps
You can use avocado oil instead of olive oil if you want something more neutral. Melted coconut oil can also work, but it may give the cake a light coconut flavor.
For the nuts, walnuts are my favorite here, but pecans or almonds are good too. I would keep the topping simple though, because the date cake already has plenty of flavor.
You can also use a regular round cake pan instead of a springform pan. Just make sure to grease it well and line the bottom with parchment paper.
Storage and reheating
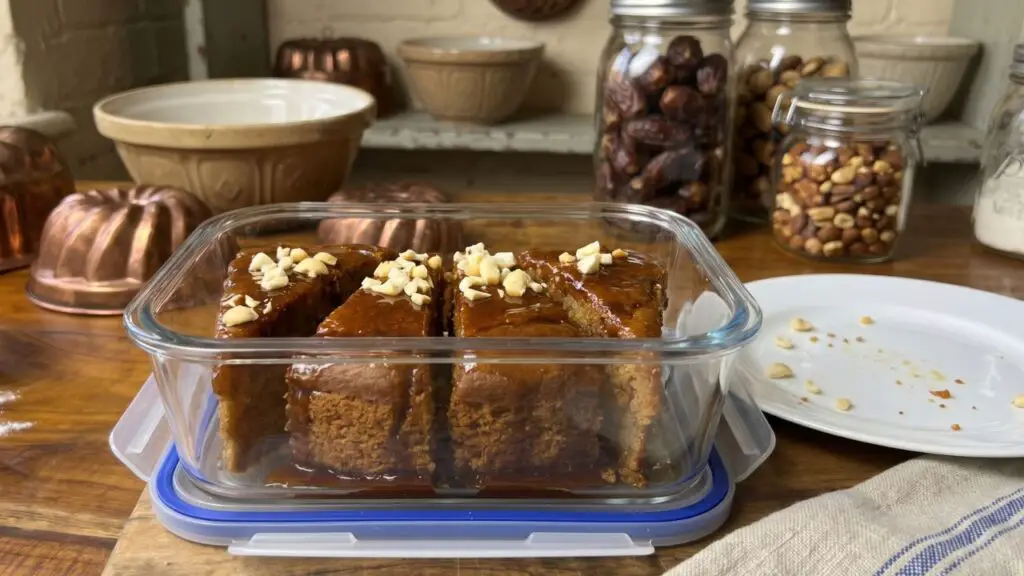
Store leftover sticky date cake in an airtight container at room temperature for about 2 days, or in the fridge for up to 5 days. Because it is such a moist cake, I like keeping it covered well so it does not dry out.
To warm a slice, microwave it for about 10 to 15 seconds. Just enough to make it soft again. It is so satisfying with tea or coffee, especially when the date syrup gets a little warm on top.
Serving ideas
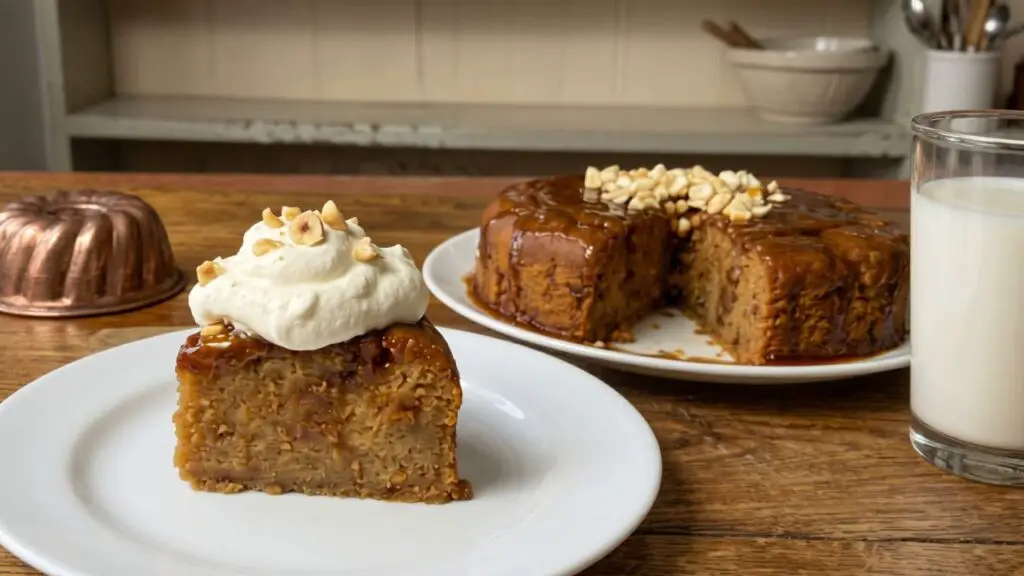
This old-fashioned date cake is lovely on its own, but it is also super delicious with a little extra date syrup on the plate. If you want dessert vibes, serve it with a spoonful of Greek yogurt, whipped cream, or a small scoop of vanilla ice cream.
For me, the best way is still slightly warm, with the walnuts on top and a hot cup of tea. Simple, cozy, and honestly so good.
More cake recipes
If you try this Grandma’s sticky date cake, leave a comment below and tell me how it turned out.
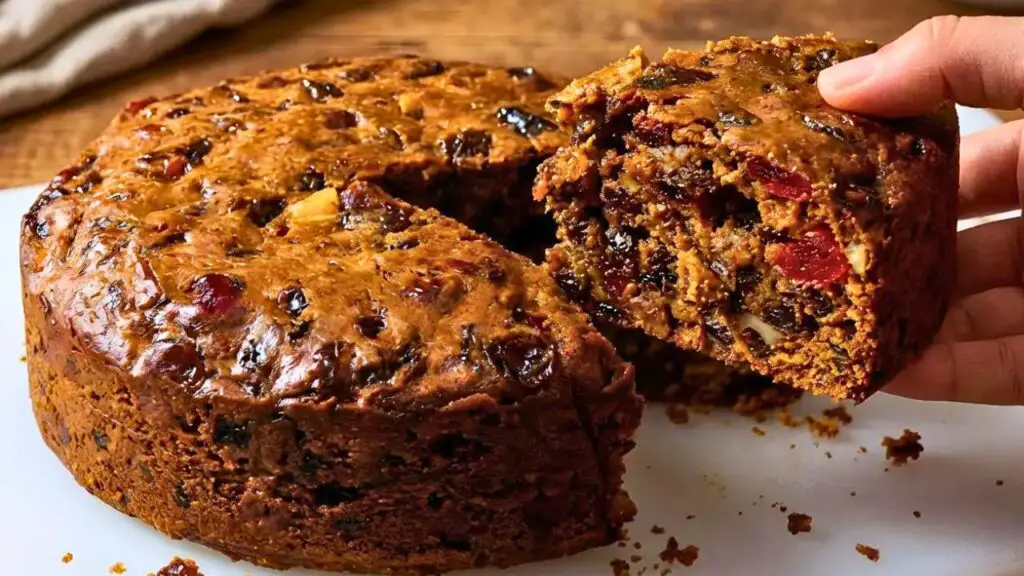
- The Best Moist Fruit Cake Recipe – A rich and moist fruit cake packed with dried fruit and warm flavors, perfect for holidays, special occasions, or an afternoon treat.
- Moist Apple Cinnamon Loaf Cake – This soft apple cinnamon loaf cake is full of cozy flavor with tender apples and a beautifully moist texture.
- Moist Banana Oatmeal Cake Recipe with a Chocolate Twist – A delicious banana oatmeal cake made extra special with a hint of chocolate for a comforting homemade dessert.
You can also ask any questions in the comment section below or in the YouTube video comments, and I’ll try to respond to all of them. And if you love cozy homemade cakes like this, make sure to check out more cake recipes below!