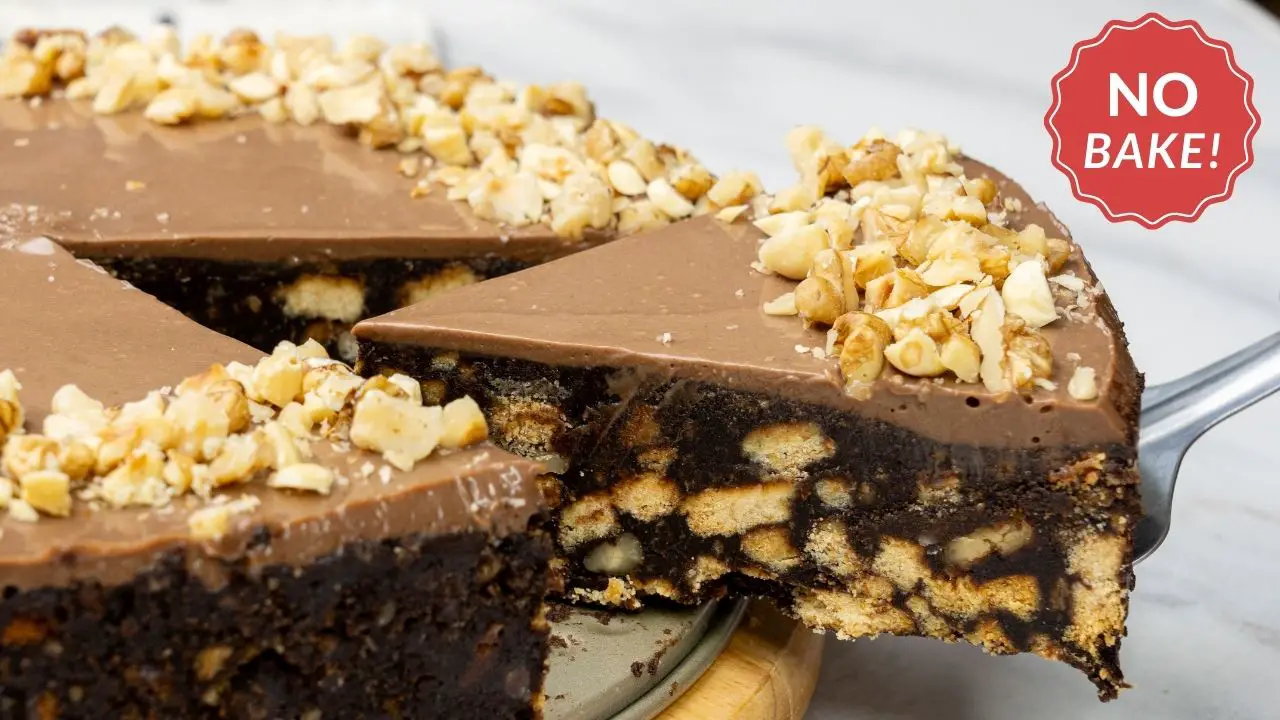
Who needs an oven when you can make something this good? This No Bake Chocolate Biscuit Cake has that perfect mix of soft, chocolaty richness and crunchy biscuit texture, and it is so easy to make you will wonder why you have not tried this no-bake cake sooner!
Watch my video below for a simple, step-by-step recipe for making this rich No-Bake Chocolate Biscuit Cake. If you find it helpful, don’t forget to like and subscribe for more easy and delicious recipes!
What Makes This No-Bake Chocolate Biscuit Cake So Special?
You should make this chocolate biscuit cake because it’s ridiculously simple to make, and totally delicious, and the mix of chocolate and crunchy biscuits makes it impossible to resist, and I have got more reasons for you below.
- Rich Chocolate Flavor – If you’re a chocolate lover, this one’s for you. Deep, fudgy, and totally irresistible.
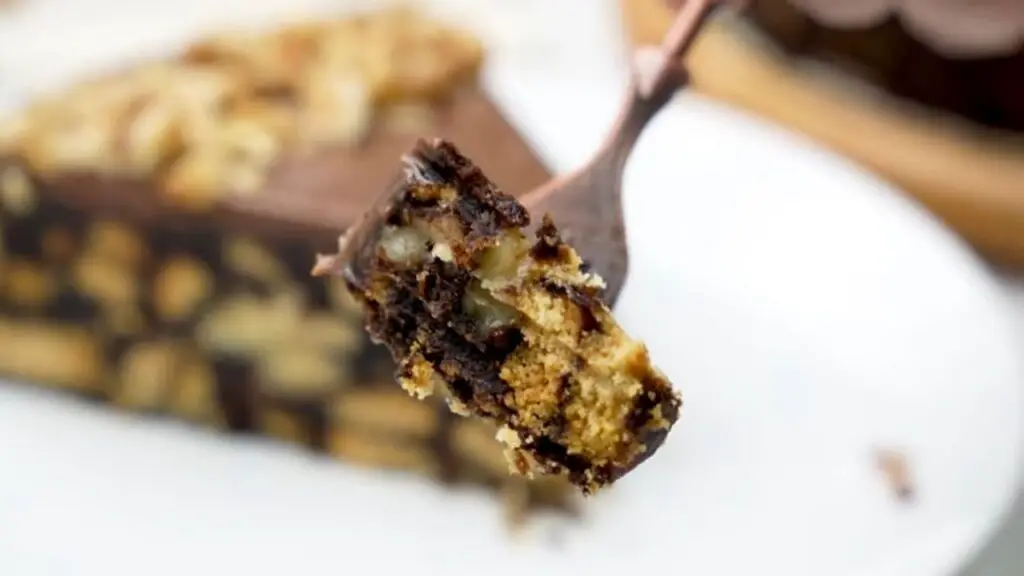
- Crunchy & Fudgy Texture – The mix of crunchy biscuits and smooth chocolate makes every bite amazing.
- No Oven Needed – Just stir, chill, and enjoy—zero baking, zero stress.
- Super Quick & Easy – Minimal effort, maximum deliciousness. Even beginners can nail this one!
- Make It Your Own – Add nuts, dried fruit, or even a splash of coffee for a fun twist.
- Perfect for Any Occasion – Whether it’s a casual snack or a fancy dessert, it never disappoints.
- Kid-Friendly & Fun – A great recipe to make with little helpers (and they’ll love eating it too!).
- Tastes Even Better the Next Day – If you can wait, chilling it overnight makes it even more delicious!
What You Need to Make This No-Bake Chocolate Biscuit Cake
What I love about this cake is how simple it is—just a few basic ingredients, no oven, and pure chocolatey goodness. You probably already have most of these ingredients in your kitchen, so let’s get started!
For The Cake
- 1 cup (100 grams) walnuts, toasted
- 1 cup (200 grams) sugar
- 1/2 cup (60 grams) unsweetened cocoa powder
- 1 cup (240 ml) water
- 2/3 cup (150 grams) unsalted butter
- 1 teaspoon (5 ml) vanilla extract
- 800 grams of digestive biscuits like the ones below, broken into small pieces
")
TAP ON IMAGE TO VIEW PRICE
For The Chocolate Ganache
- 1/2 cup (120 ml) whipping cream
- 120 grams of bittersweet chocolate, chopped
How to Make the Perfect No-Bake Chocolate Biscuit Cake at Home
Let me show you how to make this ridiculously easy No-Bake Chocolate Biscuit Cake—no oven, no hassle, just rich, chocolatey goodness in every bite.
Step 1: Toast the Walnuts
I always start by toasting the walnuts because it makes such a difference! Just toss them into a dry pan over medium heat and stir for about 5 minutes until they’re golden and fragrant. You’ll know they’re ready when your kitchen smells amazing!
Step 2: Make the Chocolate Syrup
In a saucepan, whisk together sugar and cocoa powder—this helps prevent lumps later. Now, slowly pour in the water, stirring constantly.
Step 3: Melt, Stir, and Enhance the Flavor
Once it’s smooth, add the butter and let it melt over medium heat. Keep stirring until everything comes together into a rich, glossy syrup. Finally, remove from heat and stir in the vanilla extract—trust me, this tiny step makes a big difference in flavor!
Step 4: Mix It All Together
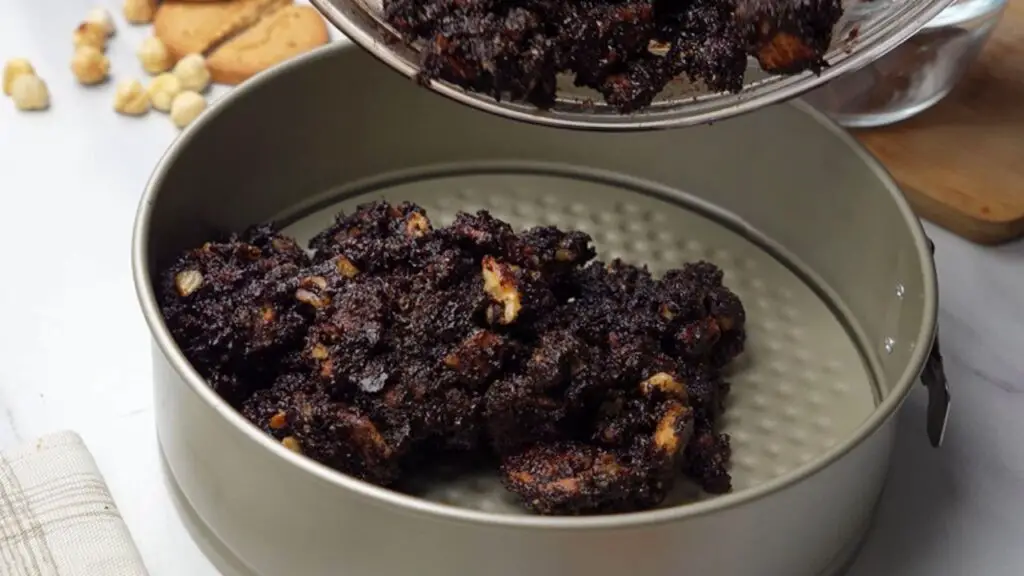
Grab a big mixing bowl and break the digestive biscuits into small chunks. You don’t want crumbs—just rough pieces to keep that crunchy texture. Add the toasted walnuts, then pour the warm chocolate syrup over everything. Now comes the fun part—mixing! Stir gently until every biscuit is coated in chocolatey goodness.
Top Tip: Want to make this cake even better? Check out my video on how to make these homemade delicious digestive biscuits.
Step 5: Shape the Cake
Transfer the mixture into a 9-inch springform tin. To make removing the cake easier later, consider lining the pan with parchment paper. Use a spoon or spatula to press it down firmly. This helps everything stick together and gives the cake its shape. One thing I always do? Run the back of my spoon over the top to smooth it out—it just looks nicer that way!
Step 6: Let It Chill
Cover the tin with plastic wrap and pop it into the fridge. Now, this is the hardest part—waiting! Let it chill for at least 1 hour so it can firm up.
Step 7: Make the Chocolate Ganache
While the cake is chilling, it’s time to make the ganache! Heat whipping cream in a small saucepan over medium heat until it just starts to simmer. Then, pour it over the chopped bittersweet chocolate and stir until it melts into a smooth, silky glaze. If you ask me, this is what takes the cake to the next level!
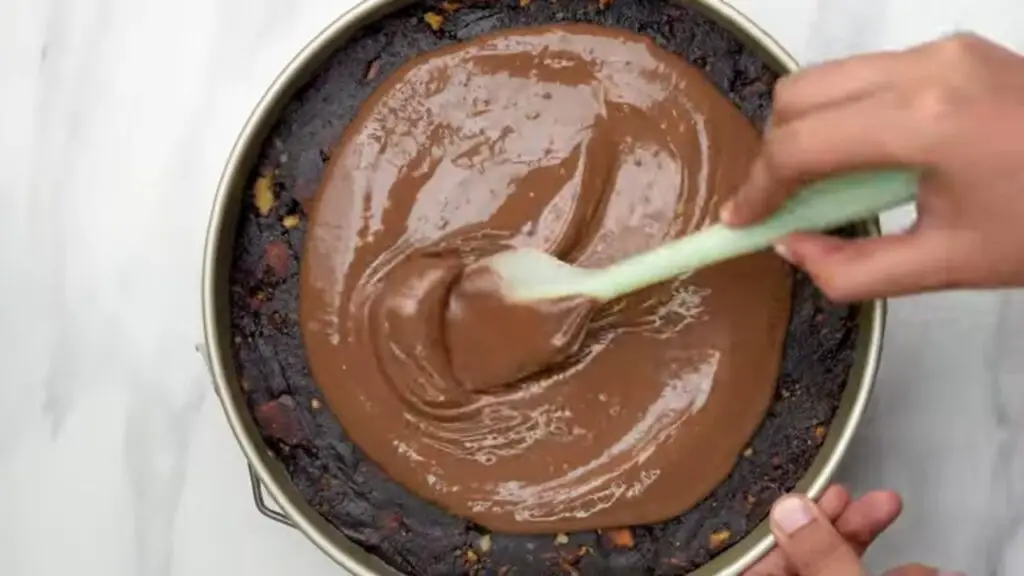
Step 8: Pour on the Chocolate Glaze
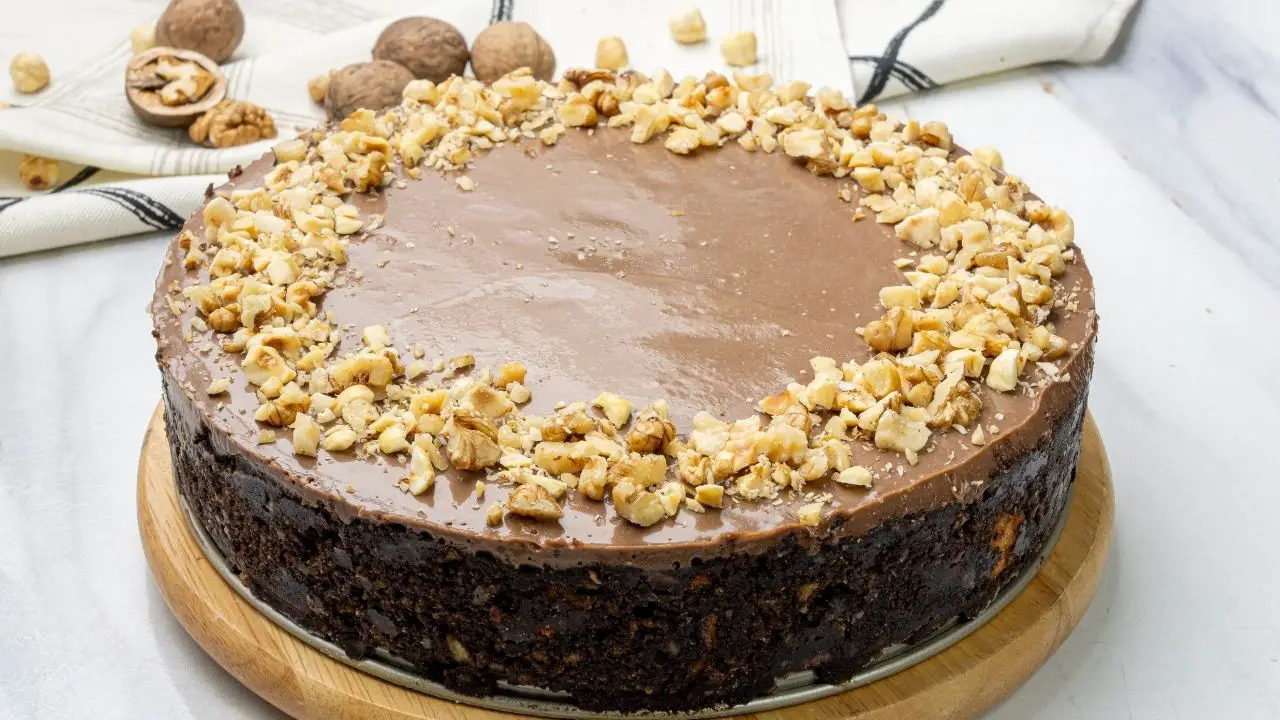
Once the cake has firmed up, take it out of the fridge and pour the ganache over the top. Start from the center and let it naturally spread to the edges. You can use a spatula or the back of a spoon to help it along.
Step 9: Chill Again & Serve
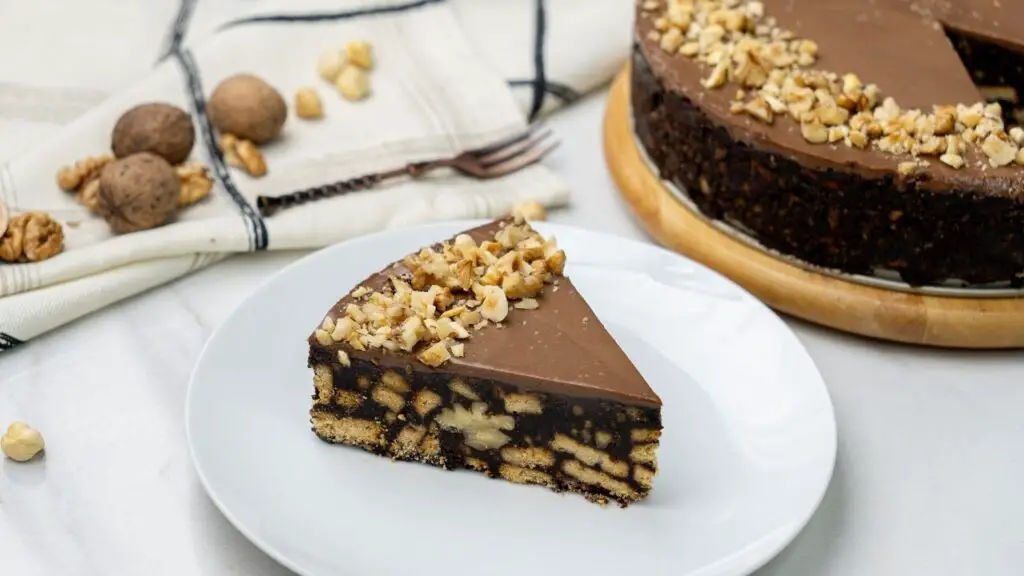
Put the cake back in the fridge for 3 to 4 hours, or overnight if you can wait that long (I usually can’t!). When it’s fully set, remove it from the tin and slice it into thick, chocolatey pieces.
Pro Tip – I’d recommend topping it with extra toasted walnuts or some crushed biscuits for that extra crunch.
Want the perfect pairing? This No-Bake Chocolate Biscuit Cake is even better with a scoop of ice cream! Don’t miss my 7 Dairy-Free Ice Creams recipes for the perfect match!
No-Bake Chocolate Biscuit Cake Recipe
To me, this No-Bake Chocolate Biscuit Cake is the ultimate feel-good dessert. The rich, fudgy chocolate and the satisfying crunch of the biscuits come together perfectly in every bite. It’s simple to make, no oven required, and somehow feels both indulgent and nostalgic—like a warm hug from your favorite childhood treat. Trust me, once you try it, you’ll want to make it again and again!
10
servings15
minutes10
minutes731
kcal4
hours4
hours25
minutesKeep the screen of your device on
Ingredients
1 cup (100 grams) walnuts, toasted
1 cup (200 grams) sugar
1/2 cup (60 grams) unsweetened cocoa powder
1 cup (240 ml) water
2/3 cup (150 grams) unsalted butter
1 teaspoon (5 ml) vanilla extract
800 grams Mcvitie’s digestive biscuits, broken into small pieces
1/2 cup (120 ml) whipping cream
120 grams dark or semi-sweet chocolate about 60% cacao, chopped
Directions
- Toast the Walnuts: Start by toasting the walnuts. Heat a dry pan over medium heat, add the walnuts, and stir for about 5 minutes until they’re golden and fragrant. This step adds an amazing nutty flavor to the cake.

- Mix the Dry Ingredients: In a saucepan, whisk together the sugar and cocoa powder to prevent lumps and ensure a smooth syrup later.

- Add the Liquid: Slowly pour the water into the saucepan, stirring constantly. This helps the sugar and cocoa dissolve evenly into a rich chocolate base.

- Melt the Butter: Add the butter to the saucepan and stir over medium heat until it’s fully melted. Keep stirring until the mixture is smooth and glossy. Remove the pan from the heat and stir in the vanilla extract. This adds a warm depth of flavor to the chocolate mixture.

- Prepare the Biscuits: Break the digestive biscuits into bite-sized pieces and place them in a large mixing bowl. The chunks will add that signature crunch to the cake. Then add the toasted walnuts to the bowl with the biscuits

- Combine the Mixture: Pour the warm chocolate syrup over everything. Stir gently until all the biscuits and walnuts are evenly coated.

- Shape the Cake: Transfer the mixture to a 9-inch springform tin lined with parchment paper. Press it down firmly with a spoon or spatula to compact it and smooth out the top.

- Chill the Cake: Cover the tin with plastic wrap and refrigerate for at least 1 hour. This allows the cake to firm up and hold its shape.

- Make the Ganache: Heat the whipping cream in a small pan until it just starts to simmer. Pour it over the chopped bittersweet chocolate and stir until the ganache is silky and smooth.

- Glaze the Cake: Take the chilled cake out of the fridge and pour the ganache over the top, letting it spread naturally. Use a spatula to smooth it out if needed.

- Chill Again: Put the cake back in the fridge for another 3–4 hours, or overnight if possible. This gives the ganache time to set beautifully.

- Serve and Enjoy: Carefully remove the cake from the tin, slice it into thick pieces, and top with extra walnuts or crushed biscuits for added crunch. Enjoy every chocolatey bite!

Recipe Video
Notes
- Use high-quality chocolate – The better the chocolate, the richer the flavor. I always go for at least 70% dark chocolate.
- Let it set properly – The longer you chill it, the firmer and better it will hold together.
- Add nuts or dried fruit – For an extra crunch, mix in chopped almonds, hazelnuts, or dried cranberries.
- Sweetness control – If you prefer it less sweet, reduce the sugar or use dark chocolate with higher cocoa content.
- Shape it differently – Instead of a loaf pan, press the mixture into a round cake pan for a more traditional cake shape.
- Garnish before serving – A dusting of cocoa powder, chocolate shavings, or a drizzle of melted chocolate makes it look extra fancy.
Nutrition Facts
- Total number of serves: 10
- Calories: 731kcal
- Fat: 37g
- Carbohydrates: 90g
- Protein: 8.4g
Related Recipe: Love chocolate? Then you’ll definitely enjoy this Moist Banana Oatmeal Cake with a Chocolate Twist! A must-try for all dessert lovers!
Common Mistakes & How to Avoid Them
Even the easiest recipes have a few little tricks to get them just right. Here are some common mistakes I’ve seen and how to avoid them for perfection.
- Using too many biscuit crumbs – You want chunks, not crumbs! Bigger pieces give the cake its signature crunch.
- Not pressing the mixture down enough – If it’s not packed tightly in the pan, it might crumble when slicing. Use a spatula to press it in firmly.
- Skipping the chilling time – I know it’s tempting to dig in early, but this cake needs time to set! Four hours is good but overnight is even better.
- Overheating the chocolate mixture – Keep the heat low and stir constantly. If it overheats, the chocolate can seize and turn grainy.
How to Customize Your No-Bake Chocolate Biscuit Cake
What do I love about this cake? You can easily make it your own! Here are some fun ways to switch it up.
- Swap the biscuits! – Digestive biscuits are the classic choice, but graham crackers, shortbread, or even Oreos work great too.
- Add a nutty crunch – Almonds, hazelnuts, or even pistachios take this cake to another level. Toast them first for extra flavor!
- Make it boozy – A splash of rum or Baileys in the chocolate mixture? Yes, please!
- Drizzle on some extra goodness – Melted white chocolate, caramel, or peanut butter on top makes it even more indulgent.
How to Store & Keep Your Chocolate Biscuit Cake Fresh
If you somehow have leftovers (rare in my house!), here’s how to store them so every bite stays just as delicious as the first!
- The fridge is your best friend – Keep it in an airtight container in the fridge for up to a week. The chocolate stays firm, and the biscuits keep their crunch.
- Want to freeze it? No problem! – Wrap it tightly in plastic wrap and freeze for up to 2 months. Just let it thaw in the fridge before serving.
- Avoid humidity – If your kitchen is too warm, the chocolate might get soft. Keep it chilled for the best texture!
Got a Question or Want to Share Your Experience?
Tried this No-Bake Chocolate Biscuit Cake recipe? Let me know how it turned out! If you have any questions, leave a comment below or on the YouTube video here—I check those more often for a quicker reply. – Jen